
Here is a quick tutorial for creating rolled roses with the Spiral Flower Originals Die from Stampin’ Up!

Start by cutting the number of flowers that you’d like to create using your Spiral Flower Originals Die. Then place the die cut between your finger and your Bone Folder and slide the length of the die cut to break the fibers up a bit to make them easier to shape.

This step is optional, I took my bone folder and curled each scallop around it as well. This just makes it easier to turn the petals outward once you have your flower rolled up.

Then begin rolling the rose with the smallest part first. I roll mine in a tight circle using just my fingers, you can also use something like your Paper-Piercing Tool and wrap the flower around it if you find it easier to use.

Continue rolling the flower until you reach the last circle in the center. Holding your rolled flower in place, apply Multipurpose Liquid Glue to the center of the circle.

Press the bottom of your flower into the glue puddle so that you get glue on the bottom of all of your card stock circles, then let the tight spiral go loose and begin shaping your flower as you’d like. Once you have the flower petals in the position that you’d like, hold them down for a few seconds so that the rolled flower adheres to the center circle base. The Multipurpose Liquid Glue will give you a minute or two to move the flower petals around before it adheres permanently.

Let your flowers dry completely, then go back and “fluff” the petals with your bone folder and fingers until they are the shape that you’d like them to be.
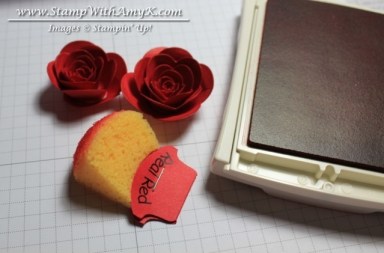
This step is also optional, but I sponged a little bit of Real Red ink on the tips of the flower petals to give them a little more definition. Then use Glue Dots or Multipurpose Liquid Glue to adhere the flowers to your project.

You can make the flowers different sizes, for my project I wanted one smaller flower so I simply trimmed the extra petals off with my Paper Snips.
Here is the project that I made with these flowers:

And you can see the blog post with instructions for making the rest of the card here.

