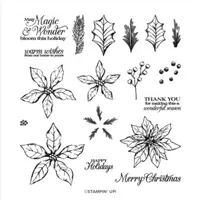
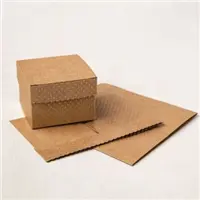
I used the Stampin’ Up! Poinsettia Petals stamp set and coordinating Poinsettia Dies to decorate one of the Scalloped Kraft Treat Boxes for Christmas. I did a video tutorial for this project and you can see it on my YouTube channel here.


I started by assembling one of the Scalloped Kraft Treat Boxes. I did add a little adhesive on the top and bottom flaps to make sure that the box would hold securely when a gift was placed inside. The circumference of the box is just over 12″, so I cut a 2″ x 12″ and a 1-1/4″ x 2″ panel of Ever Eden Specialty DSP (available while supplies last through Jan 3) and I adhere the two pieces together on one side with Stampin’ Seal+. I wrapped the length of DSP around the center of the box and secured the ends together on the top of the box with Stampin’ Seal+.


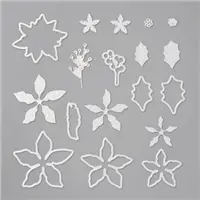
I cut panels of Evening Evergreen and Cherry Cobbler card stocks with the flower and leaf dies from the Poinsettia Dies. I adhered the Cherry Cobbler flowers together with Mini Glue Dots and then to the top of the belly band (making sure to cover the seams in the paper) with Stampin’ Dimensionals. I adhered the Evening Evergreen leaf die cuts with Mini Glue Dots under the poinsettia.


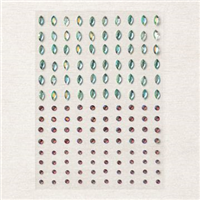
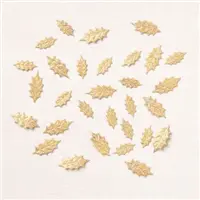
I cut a panel of Gold Foil Sheets with the berry and flower center dies from the Poinsettia Dies. I adhered the berries under the flower with Mini Glue Dots and the flower center with a Stampin’ Dimensional. I adhered two of the Gold Holly Leaves with Mini Glue Dots under the flower and then added seven Garden Gems (available while supplies last through Jan 3) to the flower center.


I stamped the sentiment from the Poinsettia Petals photopolymer stamp set in VersaMark Ink on a panel of Basic White card stock and then heat embossed it with gold embossing powder from the Metallics Embossing Powders. I cut the sentiment out with one of the Tailor Made Tags Dies and then adhered it to the belly band with Mini Glue Dots to finish the box.
You can see a list of supplies used to create this project, including the card stock cuts, at the very bottom of this blog post.
You can see the YouTube video tutorial for this project here:

I’ve created a printable PDF with written instructions and a list of products used to create this project. You can download, print and/or save it by clicking this image:


November 16-30 Host Code: EHSXTC4Z
Use this host code when you order $50 or greater and receive a free gift from me! If your order is over $150, please do not use this code, but you’ll still get the free gift. The free gift is your choice of any item valued up to $10.00 in the 2021-22 Annual Catalog or July-December 2021 Mini Catalog! That includes some of the Host Exclusive stamp sets! See my Rewards page for full details.
***Make sure that you can see my name on the final checkout page listed as your Demonstrator when you order so that you know that you’re ordering with me and you’ll get my rewards!
Last Chance Retiring Products Sale – Starts December 1
The July–December 2021 Mini Catalog will be retiring soon! Beginning December 1, stock up on your favorite products before they’re gone for good! Save up to 50% on essential craft supplies. The selection of Last Chance Products is only available while supplies last.

Click the image below to open the full retiring list from the July-December 2021 Mini Catalog (includes the sale prices that start on December 1):

If you’d prefer to download the Excel copy of the retiring list for easier reading and editing, you can see it here.

Click the image below to see the full carryover list (items that will continue to be available and items that will be available again in then July-December 2022 Mini Catalog):

Last Chance Sale Details:
- See the full Retiring List (products that will no longer be available once the catalog retires) with the sale prices here. ***The sale prices start on December 1!
- See the Carryover List (products that will still be available once the catalog retires) here.
- All retiring products are available while supplies last, and there are no purchase limits.
- Discounted items can be added to a Starter Kit and redeemed as a 50% off item or with Stampin’ Rewards.
- Last Chance Sales Period: Starts December 1, 2021 at 12:01 AM MT and ends January 3, 2022 at 11:50 PM MT
Let me know if you have any questions and don’t forget to pick up any of those items on the retiring list that you’re wanting soon so that you don’t miss out!
Start With Savings – Starter Kit Promotion – November 4-30!


The Start with Savings Starter Kit promotion will provide you with an excellent opportunity to purchase your Starter Kit at a great deal! Instead of the standard $99 Starter Kit—which is already a steal of a deal—you can pick up a completely custom Starter Kit for only $75!!! What an absolutely unbeatable bargain for a box with a value of $125!
There’s no better time than November for you to join as a demonstrator! From November 4-30, you’ll be able to purchase your Starter Kit with big savings!
PROMOTION DETAILS:
- Promotion Period: November 4-30, 2021
- When a new demonstrator orders their custom Starter Kit, they will be able to redeem $125 of qualifying products for only $75 (normally $99).
- New demonstrators who submit their Independent Demonstrator Agreement (IDA) before November 4 or after November 30 will not be eligible for this promotion. Starter Kit orders must be placed between November 4 and 30 to receive the discount.
- Joining Deadline: November 30, 2021; 11:50 PM (MT)
If you join our team, we have a private Facebook page loaded with project ideas, team meetings and trainings via video conference so that everyone can join no matter where they live in the US, prizes and giveaways for sharing projects and for recognition and you have access to my monthly card project tutorials!
If you’re ready to join, click here to head over to purchase your starter kit and join our awesome team!
If you have any questions about joining, drop me a note at amy@stampwithamyk.com, I’d be happy to chat with you more about it! You can read more about being a Demonstrator here and head over here between now and November 30 to pick up that great deal on the Starter Kit!
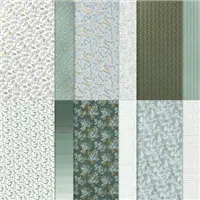
Eden’s Garden Product Suite Early Release – Available Now!


Enter and explore Eden with the Eden’s Garden Collection! This delightful collection includes early-release products from the January–June 2022 Mini Catalog—a bundle of stamps and dies that’s blooming with beauty and bounty. Plus, exclusive products you can’t uncover anywhere else—a pack of paper patterned with green and gold, a set of specialty sheets for gift-giving and textured touches, and a sparkling set of gleaming gems!
Eden’s Garden Ordering Details:
- The Eden’s Garden Stamp Set and Eden Dies can be ordered separately or as part of the full bundle.
- The Ever Eden Specialty Designer Series Paper and Eden Dies do not directly coordinate.
- The Eden’s Garden Stamp Set Bundle, Eden’s Garden Stamp Set and Eden Dies will be available in the upcoming January-June 2022 Mini Catalog.
- The following exclusive products are only available from November 2 through January 3 while supplies last (ordering deadline is January 3 at 11:50 PM MT):
- Ever Eden Specialty Designer Series Paper
- Ever Eden Cotton Paper
- Garden Gems
Click here to see the entire collection in my online store! Let me know if you have any questions.
If you need any stamping supplies, I’d be very happy to be your Demonstrator. Just click on the Order Stampin’ Up! Online Now button on the right side of the screen to go directly to my online store or drop me an email if you have any questions. Happy Stamping!


- Visit my online store here. Or scan the QR code below to go right to my online store via mobile device:


- Shop the Clearance Rack here.
- Earn FREE Stampin’ Up! Products – Join my Running Shoe Rewards Program – My online customer thank you program!
- Interested in purchasing a Starter Kit so that you can save at least 20% on every order that you place? Check out the details here.
- In addition to my online store, also take PayPal payments for orders – Check my Rewards page for more information.
- I offer gift certificates for Stampin’ Up! merchandise too! Click on my Gift Certificates page for more information.
- Follow me on:
![]()
![]()
![]()
![]()

Card stock cuts for this project:
- Scalloped Kraft Treat Boxes – precut gift box
- Cherry Cobbler – three Poinsettia die cuts
- Evening Evergreen – three Poinsettia die cuts
- Basic White – Tailor Made Tags die cut
- Ever Eden Specialty Designer Series Paper – 2″ x 12″ panel, 1-1/4″ x 2″ panel
Stampin’ Up! products used to create this project:


Price: $15.00