I used the Stampin’ Up! Fluffiest Friends stamp set bundle from the upcoming Online Exclusives (available November 7) to create a birthday card to share with you today. I also did a video tutorial for this card and you can see it on YouTube here.


My card design was inspired by The Paper Players Challenge PP664. I went on the diagonal from lower left to upper right and straight down the middle.


I stated by adhering a panel of Pool Party card stock to the front of a Thick Basic White card base with Stampin’ Seal. Then I cut a panel of Glorious Gingham 6″ x 6″ DSP with one of the Fluffiest Friends Dies (available November 7). I cut a panel of Granny Apple Green card stock three times with the grass die from the Fluffiest Friends Dies and then adhered the die cuts to the back of the die cut opening on the DSP panel with Multipurpose Liquid Glue. I adhered the DSP panel to the card front with Stampin’ Dimensionals.


Then I stamped the bear image from the Fluffiest Friends stamp set (available November 7) in Tuxedo Black Memento ink on a panel of Basic White card stock and then stamped the bee image from the Fluffiest Friends stamp set in Tuxedo Black Memento ink on the Pool Party panel on the card front. I colored the stamped images with Light and Dark Pecan Pie, Crumb Cake, Poppy Parade and Lemon Lolly Stampin’ Blends Markers and then cut the bear out with the coordinating die from the Fluffiest Friends Dies. I adhered the die cut bear with Mini Glue Dots to the card front.


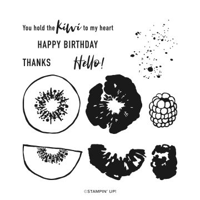
I cut panels of Crumb Cake, Granny Apple Green and Lemon Lolly card stocks with the Fluffiest Friends Dies. I adhered the die cut pieces to the card front with Multipurpose Liquid Glue and Mini Glue Dots. Then I tied a small bow from Linen Thread and adhered it with a Mini Glue Dot to the card front. I stamped the sentiment from the Hello Kiwi photopolymer stamp set in VersaMark ink on a panel of Poppy Parade card stock, sprinkled it with white embossing powder from the Basics Embossing Powders and then heat embossed it. I cut the sentiment out with one of the Stylish Shapes Dies and then adhered it with Stampin’ Dimensionals to the card front. Adhere two of the Rustic Metallic Adhesive-Backed Dots to finish the card front.


I stamped the sentiment from the Pansy Patch photopolymer stamp set in Pecan Pie ink on a panel of Basic White card stock and then adhered a strip of Glorious Gingham DSP to finish the inside of the card.
You can see a list of supplies used to create this project, including the card stock cuts, at the very bottom of this blog post.
You can see the YouTube video tutorial for this project here:

I’ve created a printable PDF with written instructions and a list of products used to create this project. You can download, print and/or save it by clicking this image:


November 1-15 Host Code: R2SSH34H
Use this host code when you order $50 or greater and receive a free gift from me! If your order is over $150, please do not use this code, but you’ll still get the free gift. The free gift is your choice of any item valued up to $10.00 in the 2023-2024 Annual Catalog! For orders placed after September 1, you can pick a $10 item from either the Annual Catalog or the September-December 2023 Mini Catalog! That includes some of the Host Exclusive stamp sets! See my Rewards page for full details.
Orders of $50+ placed through my online store also get my card class tutorials for the month! You can see the details on my Rewards page.
***Make sure that you can see my name on the final checkout page listed as your Demonstrator when you order so that you know that you’re ordering with me and you’ll get my rewards!
The Best Destination Card Kit – Available Now In The Kits Collection!


Plan a crafting getaway today with the all-inclusive The Best Destination Kit! This kit lets you make nine tri-fold cards with a colorful, nostalgic, travel vibe. Resort-hopping was never so easy!

The Best Destination Card Kit Details:
- Enough supplies to create 9 cards—3 each of 3 designs
- 9 coordinating envelopes
- Best Destination Photopolymer Stamp Set
- One Gorgeous Grape Ink Spot
- Printed card bases, printed die cuts, adhesive, embellishments, and a clear block
- Finished card size: 5-1/2″ x 4-1/4″
- Coordinating colors: Balmy Blue, Boho Blue, Cajun Craze, Calypso Coral, Coastal Cabana, Crushed Curry, Daffodil Delight, Early Espresso, Flirty Flamingo, Fresh Freesia, Gorgeous Grape, Granny Apple Green, Misty Moonlight, Pecan Pie, Petal Pink, Pretty Peacock, and Shaded Spruce
- Item number: 163186
- Price: $20
Check out the awesome stamp set that is included in the kit!

Click here to head over to the Kits Collection in the online store to see all of the kits that are available now!
Online Exclusives From Stampin’ Up! – Available Now & New Items Coming November 7!

Stampin’ Up! has some Online Exclusive items that are available to order now!! You won’t find these products in any catalog, they’ll only be listed in the online store. There will be new items added beginning November 7…check out some of the pretty spring things that will be available then in the photo above!
The Online Exclusive product releases will continue throughout the year so there will be new products to shop from, in addition to new catalogs!
Click here to head over to the online store to see what’s available in the Online Exclusives now!
If you need any stamping supplies, I’d be very happy to be your Demonstrator. Just click on the Order Stampin’ Up! Online Now button on the right side of the screen to go directly to my online store or drop me an email if you have any questions. Happy Stamping!


- Visit my online store here. Or scan the QR code below to go right to my online store via mobile device:


- Shop the Clearance Rack here.
- Earn FREE Stampin’ Up! Products – Join my Running Shoe Rewards Program – My online customer thank you program!
- Interested in purchasing a Starter Kit so that you can save at least 20% on every order that you place? Check out the details here.
- In addition to my online store, also take PayPal payments for orders – Check my Rewards page for more information.
- I offer gift certificates for Stampin’ Up! merchandise too! Click on my Gift Certificates page for more information.
- Follow me on:
![]()
![]()
![]()
![]()

Card stock cuts for this project:
- Thick Basic White – 4-1/4″ x 11″ card base scored at 5-1/2″
- Pool Party – 3-3/4″ x 5″ panel
- Granny Apple Green – nine Fluffiest Friends die cuts
- Lemon Lolly – Fluffiest Friends die cut
- Crumb Cake – Fluffiest Friends die cut
- Poppy Parade – Stylish Shapes die cuts
- Basic White – Fluffiest Friends die cut, 4″ x 5-1/4″ panel (inside card)
- Glorious Gingham 6″ x 6″ Designer Series Paper – 4″ x 5-1/4″ panel, 3/4″ x 4″ strip (inside card)
Stampin’ Up! products used to create this project: