
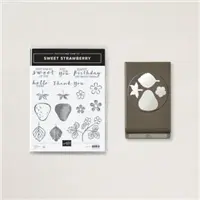
I used the Stampin’ Up! Sweet Strawberry stamp set bundle to create a cute thank you card to share with you today. I also did a video tutorial for this project and you can see it on my YouTube channel here.

My card design was inspired by Inspire.Create.Challenge #082.

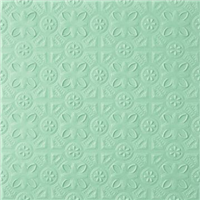
I started by embossing a panel of Basic White card stock with the Tin Tile 3D Embossing Folder. I adhered the embossed panel to a panel of Basic White card stock with Stampin’ Seal and then to the Thick Basic White card front with Stampin’ Dimensionals.

I stamped the flower and leaf image from the Sweet Strawberry photopolymer stamp set in Garden Green ink on a panel of Basic White card stock and then colored the image with Light and Dark Granny Apple Green and Daffodil Delight Stampin’ Blends Markers. I cut around the image with one of the Hippo & Friends Dies and then adhered the die cut image to the card front with Stampin’ Seal.

I stamped the sentiment from the Sweet Strawberry stamp set in VersaMark Ink on a panel of Poppy Parade card stock, sprinkled it with White Stampin’ Emboss Powder and then heat embossed it. I cut the sentiment out with one of the Stitched Shapes Dies and adhered it with Stampin’ Dimensionals to the card front.

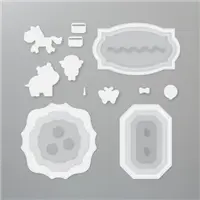
I stamped the lined strawberry images in Poppy Parade ink and the lined strawberry top and leaf images in Garden Green ink from the Sweet Strawberry stamp set on a panel of Basic White card stock. I stamped the solid strawberry image and the solid strawberry top and leaf images from the Sweet Strawberry stamp set in Granny Apple Green ink over the lined images and then punched them out with the Strawberry Builder Punch. I adhered the strawberries together with Glue Dots and then used Glue Dots to adhered the three leaves and two of the strawberries to the card front. I adhered the final strawberry with Stampin’ Dimensionals and added a Rhinestone Basic Jewel to finish the card front.

I stamped the flower and leaf image from the Sweet Strawberry photopolymer stamp set in Garden Green ink on two corners of a panel of Basic White card stock and then colored the images with Light and Dark Granny Apple Green and Daffodil Delight Stampin’ Blends Markers to finish the inside of the card.
You can see a list of supplies used to create this project, including the card stock cuts, at the very bottom of this blog post.
You can see the YouTube video tutorial for this project here:
I’ve created a printable PDF with written instructions and a list of products used to create this project. You can download, print and/or save it by clicking this image:

January 16-31 Host Code: R66SSKQE
Use this host code when you order $50 or greater and receive a free gift from me! If your order is over $150, please do not use this code, but you’ll still get the free gift. The free gift is your choice of any item valued up to $10.00 in the 2020-21 Annual Catalog or January-June 2021 Mini Catalog! That includes some of the Host Exclusive stamp sets! See my Rewards page for full details.
***Make sure that you can see my name on the final checkout page listed as your Demonstrator when you order so that you know that you’re ordering with me and you’ll get my rewards! 🙂
Sale-a-bration 2021 Going On Now!!!

Stampin’ Up!’s Sale-a-bration event is happening now!!

During Sale-A-Bration, you can earn FREE products. For every $50 or $100 you spend, you can choose between two purchasing levels of free products! There are 8 free products available to pick from at the $50 level and 2 free products to pick from at the $100 level!

Stampin’ Up! is offering an exclusive host stamp set called Punch Party and you can get it for FREE with an order of $300 or greater placed during Sale-a-bration or by hosting a workshop with orders totaling $300 or greater during Sale-a-bration! You can see more details and find the list of punches that it coordinates with on page 17 in the Sale-a-bration Brochure.

There’s no better time to join than during Sale-A-Bration to purchase your Starter Kit and join Stampin’ Up! Starting January 5, Stampin’ Up! is offering five FREE packs of 6″ x 6″ Designer Series Paper from the upcoming 2021-2022 Annual Catalog with your Starter Kit if you join during Sale-a-bration! The Starter Kit is $99 + tax and it ships for free. You get to pick $125 in Stampin’ Up! merchandise of your choice for your kit. It’s a great deal!!

Click here to purchase your Starter Kit!
If you have any questions or need copies of the current catalogs, drop me an email at amy@stampwithamyk.com. I’m happy to answer any questions!
If you need any stamping supplies, I’d be very happy to be your Demonstrator. Just click on the Order Stampin’ Up! Online Now button on the right side of the screen to go directly to my online store or drop me an email if you have any questions. Happy Stamping!

- Visit my online store here. Or scan the QR code below to go right to my online store via mobile device:

- Shop the Clearance Rack here.
- Earn FREE Stampin’ Up! Products – Join my Running Shoe Rewards Program – My online customer thank you program!
- In addition to my online store, also take PayPal payments for orders – Check my Rewards page for more information.
- I offer gift certificates for Stampin’ Up! merchandise too! Click on my Gift Certificates page for more information.
- Follow me on:
![]()
![]()
![]()
![]()
Card stock cuts for this project:
- Thick Basic White – 4-1/4″ x 11″ card base scored at 5-1/2″
- Poppy Parade – Stitched Shapes die cut
- Basic White – 3-7/8″ x 5-1/8″ panel, nine Strawberry Builder Punches, Hippo & Friends die cut, two 4″ x 5-1/4″ panels (one inside card)
Stampin’ Up! products used to create this project:


Love this! The tin tile embossing folder is perfect with the strawberries!😊
Thanks Akiko! 🙂
This is really pretty! Love the bright berries with the white textured backdrop!
Thanks Linda! 🙂
such a pretty happy card and love that embossed background
Thanks Sandi! 🙂
Very pretty. I love this stamp set.
Thanks Ida! 🙂
Beautiful card!
Thank you! 🙂