
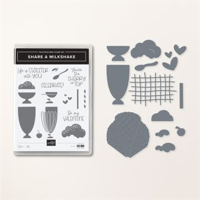
I used the Stampin’ Up! Share A Milkshake stamp set bundle to create a birthday card to share with you today. I also did a video tutorial for this card and you can see it on YouTube here.

My card design was inspired by Sketch Saturday #720.

My card also works for the Retro Rubber Challenge #201. I went from upper left to lower right.

I started by embossing a panel of Basic White card stock with the crosshatch embossing folder from the Basic 3D Embossing Folders (Online Exclusive). I adhered the embossed panel to the front of a Thick Basic White card base with Multipurpose Liquid Glue. Then I adhered a panel of Flirty Flamingo card stock to the card front with Stampin’ Seal.

I cut a panel of Basic White card stock with two of the Stitched Rectangle Dies and then adhered the die cut panels to panels of Early Espresso card stock with Stampin’ Seal. I adhered the layered panels to the card front with Stampin’ Seal.

I stamped the images from the Share A Milkshake photopolymer stamp set in Crumb Cake, Coastal Cabana, Melon Mambo, Flirty Flamingo, Petal Pink, Granny Apple Green and Sweet Sorbet inks on a panel of Basic White card stock. I cut the images out with the coordinating dies from the Share A Milkshake Dies. I cut a panel of Early Espresso card stock with dies from the Share A Milkshake Dies and then adhered the die cut pieces to the card front with Mini Glue Dots and Multipurpose Liquid Glue.

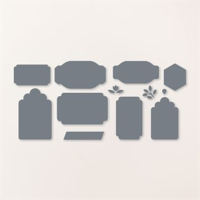
I tied a small bow from Linen Thread and adhered it with a Mini Glue Dot to the card front. Then I stamped the sentiment from the Share A Milkshake stamp set in Early Espresso ink on a panel of Basic White card stock and cut it out with one of the Something Fancy Dies. I adhered the die cut sentiment with Stampin’ Dimensionals to the card front and then added three Opaque Adhesive-Backed Gems to finish the card front.

I stamped the images from the Share A Milkshake stamp set in Crumb Cake and Melon Mambo inks on a panel of Basic White card stock to finish the inside of the card.
You can see a list of supplies used to create this project, including the card stock cuts, at the very bottom of this blog post.
You can see the YouTube video tutorial for this project here:
I’ve created a printable PDF with written instructions and a list of products used to create this project. You can download the free tutorial, print and/or save it by clicking this image:

March 1-15 Host Code: ZV23MYZY
Use this host code when you order $50 or greater and receive a free gift from me! If your order is over $150, please do not use this code, but you’ll still get the free gift. The free gift is your choice of any item valued up to $10.00 in the 2022-23 Annual Catalog or January-April 2023 Mini Catalog! That includes some of the Host Exclusive stamp sets! See my Rewards page for full details.
Orders of $50+ placed through my online store also get my card class tutorials for the month! You can see the details on my Rewards page.
***Make sure that you can see my name on the final checkout page listed as your Demonstrator when you order so that you know that you’re ordering with me and you’ll get my rewards!
Online Exclusives From Stampin’ Up! – Available Now!

Stampin’ Up! has some new Online Exclusive items that are available to order now!! You won’t find these products in any catalog, they’ll only be listed in the online store.
The Online Exclusive product releases will continue throughout the year so there will be new products to shop from, in addition to new catalogs!
Click here to head over to the online store to see the new Online Exclusives now!
Colorful Kaleidoscope Kit – Available Now!

Get ready for the latest addition to the Kits Collection by Stampin’ Up! The Colorful Kaleidoscope Kit is filled with geometric shapes and unique kaleidoscopic patterns. It’s time to give a card that no one will forget!

This kit is $23 and is item number 161804. It will be available to purchase beginning March 1!

This kit includes:
- 9 full-size cards, 3 each of 3 designs, measuring 4-1/4″ x 5-1/2″ and 9 coordinating envelopes.
- One photopolymer stamp set with all-occasion sentiments that go beyond the basics.
- One Gray Granite Stampin’ Spot.
- 9 peek-through laser cuts that can easily be layered to create a kaleidoscopic effect.
- Precut die cuts that are lined with gold foil, perfect for all your stamped sentiments.
- Mini Stampin’ Dimensionals, Tear & Tape Adhesive, and Foam Adhesive Strips.
- Gold, pearlized embellishments.
- The coordinating colors are Bermuda Bay, Calypso Coral, Gray Granite, Night of Navy, and Petal Pink.
- Each project takes less than 60 minutes to complete.
Check out the stamp set that’s included with the kit! Lots of great uses for this one!

Click here to head over to the Kits Collection in the online store to see all of the kits that are available now and pick up this fantastic new kit!
If you need any stamping supplies, I’d be very happy to be your Demonstrator. Just click on the Order Stampin’ Up! Online Now button on the right side of the screen to go directly to my online store or drop me an email if you have any questions. Happy Stamping!

- Visit my online store here. Or scan the QR code below to go right to my online store via mobile device:

- Shop the Clearance Rack here.
- Earn FREE Stampin’ Up! Products – Join my Running Shoe Rewards Program – My online customer thank you program!
- Interested in purchasing a Starter Kit so that you can save at least 20% on every order that you place? Check out the details here.
- In addition to my online store, also take PayPal payments for orders – Check my Rewards page for more information.
- I offer gift certificates for Stampin’ Up! merchandise too! Click on my Gift Certificates page for more information.
- Follow me on:
![]()
![]()
![]()
![]()
Card stock cuts for this project:
- Thick Basic White – 4-1/4″ x 11″ card base scored at 5-1/2″
- Flirty Flamingo – 3-1/2″ x 4″ panel
- Early Espresso – two 1-1/4″ x 1-3/4″ panels, 1-3/4″ x 3-3/4″ panel, three Share A Milkshake die cuts
- Basic White – 4-1/4″ x 5-1/2″ panel, eight Share A Milkshake die cuts, three Stitched Rectangle die cuts, Something Fancy die cut, 4″ x 5-1/4″ panel (inside card)
Stampin’ Up! products used to create this project:


this is so cute and fun, and what a great layout
Thanks Sandi! 🙂
I watched this video last night. I love the layout and how you used this stamp set. Wonderful color combination!
Thanks Beverly! 🙂
Well, I LOVE this card – one of my favorite stamp sets, for sure – great colors, perfect fun layout – just awesome! But, I don’t think this stamp set is over a year old yet, so while perfect choices on our tic-tac-toe, it still needs to “mature” a little for Retro, lol. Thanks so much for sharing it there, though – I can’t tell you how many times I’ve done this, and I’m on the design team, lol… Your two-step stamping is always so perfect, too!
Thanks for stopping by to leave a comment! Oopsie…apparently I do not read the directions carefully. I’ll try to make a note of that for future challenges! 🙂
This is such a fun card! Love this set….cute as can be!
Thanks Linda! 🙂
What luscious colors and fantastic yummy images 🙂 Thank you so much for joining us at Sketch Saturday.
Thanks for stopping by to leave a comment! 🙂
How delicious is your card Amy ?! Love that stamp set and it fits beautifully with our challenge. Thanks for joining us at Sketch Saturday.
Thanks for stopping by to leave a comment! 🙂