
I used the new hostess set from Stampin’ Up! called Bloom With Hope to create a card to share with you today. I thought the images would work well for the faux tile technique. I created a photo tutorial for this fun technique awhile back and you can see it here.

My card design was inspired by Retrosketches #119.

I started by scoring a Very Vanilla panel at 1″, 2″, 3″ and 4″. Then I turned the panel 90 degrees and scored between the lines it in various places, no specific measurements, just tried to come close to the look of the sketch.

I carefully stamped the images from the Bloom With Hope stamp set in Crisp Cantaloupe and Pistachio Pudding inks on the panel. Then I inked up part of the sentiment from the Lots of Thanks stamp set (used a Post-it Note to cover the area that I didn’t want inked) with Baked Brown Sugar ink and stamped it on the panel.

Then I sponged the little tiles with Baked Brown Sugar ink and patted the entire panel with VersaMark Ink. I sprinkled Clear Stampin’ Emboss Powder over the panel and heat embossed it. I adhered the embossed panel to a panel of Baked Brown Sugar card stock with Fast Fuse Adhesive (see the how to video here), then to a Crisp Cantaloupe card base with Stampin’ Dimensionals.

I colored a Very Vintage Designer Button with my Natural Stampin’ Blendabilities Marker, then colored the curly edges with my Bronze Stampin’ Blendabilities Marker. I tied a piece of Gold Baker’s Twine through the button and adhered it to the card front with a Glue Dot.
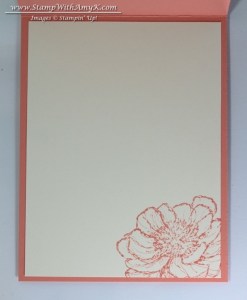
I kept the inside fairly simple by stamping the image from the Bloom With Hope stamp set in Crisp Cantaloupe ink on a Very Vanilla panel.
You can find a complete list of supplies, including card stock cuts, at the very bottom of this post.
June 16-30 Hostess Code: 6QF9TG9V
Use this hostess code when you order and receive a free gift from me! If your order is over $150, please do not use this code, but you’ll still get the free gift! The free gift for June is a package of the 2013-15 In Color Sequin Assortment PLUS your choice of one of the 1/16″ Baker’s Twine colors (Basic Black, Basic Gray, Bermuda Bay, Blushing Bride, Cherry Cobbler, Crushed Curry, Early Espresso, Old Olive, Tangerine Tango or Whisper White).
Round 2 of the Stamp With Amy K 2014-15 Ribbon and DSP Shares…Just a Few Days Left to Join!

***A new round of DSP shares has been opened***Let me know if you’d like to join in!!
I’m offering a second round of ribbon and Designer Series Paper shares! You can see the full details on my 2014-15 Annual Catalog Shares page here. Let me know if you have any questions or if you’d like to join. To be included for this round of shares, sign up by Monday, June 23!
Weekly Deals From Stampin’ Up! June 17-23
Here are this weeks Weekly Deals:

Click here to see the Weekly Deals from Stampin’ Up! in my online store. The Weekly Deals are only while supplies last and only available at these great prices through June 23.
If you need any stamping supplies, I’d be very happy to be your Demonstrator. Just click on the Order Stampin’ Up! Online Now button on the right side of the screen to go directly to my online store or drop me an email if you have any questions. Happy Stamping!

- Visit my online store here.
- Shop the Clearance Rack here.
- Earn FREE Stampin’ Up! Products – Join my Running Shoe Rewards Program – My online customer thank you program!
- In addition to my online store, also take PayPal payments for orders – Check my Rewards page for more information.
- I offer gift certificates for Stampin’ Up! merchandise too! Click on my Gift Certificates page for more information.
Stampin’ Up! items used to create this project:


- Crisp Cantaloupe – 4-1/4″ x 11″ card base
- Baked Brown Sugar – 4″ x 5-1/4″ panel
- Very Vanilla – 3-7/8″ x 5-1/8″ panel, 4″ x 5-1/4″ panel (inside card)

Oh Amy, this card is so beautiful. Thanks for sharing the tutorial too. I will have to give this technique a try. I also like the way you colored the button. It really matches the card well. Nicely done!
Thanks so much Terri! It’s a fun and easy technique, have fun using it!
Such a pretty card! Love this technique you shared 🙂 These colors lend themselves so beautifully to this vintage-y look. I can’t wait to try and color buttons, yours came out so awesome!
Thanks Jill! I just started coloring on the back of the button until I found the mix that I thought looked best and went with that. 🙂
Oooh, that is a GREAT tip! I’d be the one to color the front and not be happy, thanks Amy 🙂
You are welcome. I initially was going to start coloring the front, then realized that I didn’t know what colors to use so (thankfully) I flipped it over and played a little until I found the colors that I liked best. 🙂
Such a pretty card! I love how soft and subtle it is!
Thanks for joining us this week at Retro Sketches!
Thanks so much for stopping by to leave a comment! 🙂